21. 12. 2013

Super soft Gingerbread cookies

Shiny super soft dragons and F-14s. You can tell I have twoo girls, can´t you?:-))
As I started writing, the baby started crying. I am waiting to see if she needs me and this post will have to wait once and again.

All is quiet, it was just a dream. Let´s get started...

I make these because I don´t like the traditional gingerbread cookies that many people make. They are usually hard as stone and I don´t have the skill to organize my time to make them a month or so before Christmas to allow them to get softer.
So I searched an easy alternative, something I could make with the kids, and here it is!

The original recipe can be found on many Czech cooking websites, so I don´t really know whom to thank. And I changed it anyways,  as usually:-)

Normally you would need:
400g  of flour (superfine or cake flour or whatever it is called over the ocean:-)
140g powdered sugar (I make my own sometimes)
50g butter (half a stick is fine, but for the rest of the ingredients - good luck with the conversions:-)
2 eggs (I use large or 3 small)
2 tablespoons of honey
1 teaspoon of baking soda (too much for my liking)
1 teaspoon of spice (we get gingerbread mix here, but you can use your own with cinnamon, badyan, cloves and stuff)
1 egg yolk for right-after-baking brush (they get nice and shiny after that)

I suggest:
less sugar - more honey (if the dough gets sticky, just add a teensy bit more flour)
a bit more butter (10g-20g for pliability:-)
less soda (they are poofy enough with half a teaspoon)
for The Brush (I have no idea if this term is real but I like it and WILL use it:-) any part of egg will do, even whole egg. And adding a bit of water makes it easier to apply. Just as long as it is at least a bit slimey from the egg.

I mix all the dry ingredients and add the rest. Use my hands to get the butter soft and mix it and squeeze it all together until I get a lovely ball of dough which almost doesn´t stick but is still soft and pliable. Knead it for a little while, cover with foil or put in a plastic bag and stick it in the fridge for at least 30 minutes. Overnight is OK. I actually have one still in the fridge from a few days ago. I guess it is still fine, too:-)

When you are ready to baky (and to clean the mess your kids make while helping), take it out of the fridge, let is sit or just knead it soft with your strong hands (letting it sit for a while makes it way easier to do this). And you are ready to roll! Literally.

If your cookies are about 3-4 mm high (or thick?:-), bake them 8 minutes at about 160°C (math again if you´re from the States:-). Thinner cookies need shorter time, chunkier ones a bit longer, but do time it. It is vital to stick to the right timing here so that they remain soft (I mostly ignore precise measurements and times in recipes and use what I have and what I know to make stuff, but this is SERIOUS:-)

Once they are ready to get out of the oven, have your Brush mixture ready and spread it on each and every one (evenly, if you can) to make them glisten and sparkle and show off your baking might when you present then to admiring fans later on.

To make them really traditional, you might want to beat egg whites with some powdered sugar and a few drops of lemon juice into oblivion (meaning about 15 minutes of whisking) and create frosting. This type of frosting needs to be applied in thin lines, preferably neat and symetrical, we used to do it using a plastic bag with a cut corner. That was B.C. (Before Children:-)
There are some other people´s designs that I like here

Good luck!

31. 5. 2013

Dough proofing fascination / Zaujetí kynutým těstem


It all started with the re-discovery of our bread machine and an unbearable craving for home-made "buchty" (something like sugar buns but with various kinds of filling, the most surprising being the poppy seed filling:-). I had never made those so I decided to take it easy and start with some buns and things I considered hard to spoil.
The recipe is very easy, no need to knead anything, your bread maching does all that, you just have to sit (or, in my case, do about a zillion other things) and wait for the beep. I would love to remember and quote the original recipe that had inspired me, but I cannot find it anymore. The fact is that I slightly changed it after trying out different types of flours.You will need this for the dough and put it in the machine in the given order:
250 ml water (I use 1 full Ikea kids beaker)
1 egg
2 tablespoons of oil
a pinch of salt
200 g of fine flour
300 g of semi-coarse flour (if you don´t have the 3 types of flour, then go with your typical one and do the whole amout in it. Just not the self-rising type!:-)
1-2 tablespoons of sugar for the buns (I put just one, just enough for the yeast to start working)
2 more tablespoons of sugar for the sweet Buchty
1/3 of the freash yeast or a packet of dried yeast

After the dough is ready, it will be almost crawling out of the machine, you just need to press it down with your fist (it will go "pshooo" and kind of loose its volume). Then get it out on wherever you are planing to work with it and shape it any way you like. Smaller shapes seem to work better, though I have tried two loaves, even one giant loaf, but they tend to be too crumble-y and just didn´t really work for us. But any sort of buns, pretzels, rolls and such will come out great. 
When you are done shaping, cover your creations with a clean dishcloth and let proof for about 30 minutes. Preheat your oven on 180°C and bake till they are slightly browninsh on top and sound hollow when you knock on them. I also check with a long toothpick and when it comes out clean, we´re all done!

Later on, as I figured I knew what I was doing, I started adding some herbs to the dough, like oregano, basil, or substituted the regular oil with olive oil for more fun and next thing you know - the brioches came around:-) More in the next post!

This is a pretzel cut in half

Some of our funky rolls (can you spot the one my toddler made?:-)(actually there are three but that one really stands out:-)


27. 5. 2013

Today´s lunch / Dnešní oběd


I have to share a recipe I made today at lunchtime and it ended up being my and my older one´s lunch. They were cookies. Very sweet cookies. Nothing really healthy about them, but the soft, chewy middle and crunchy sides, that is something you can hardly achieve with (very limited at our house) healthy supplies. And I had been craving these for ages:-)

The recipe is a variation of this one http://sallysbakingaddiction.com/2013/05/13/chewy-chocolate-chunk-cookies/, but since we have different units for measuring ingedients, I slightly rounded up the amounts. So now my version is this:
And this is what happens when you bake on a hungry stomach - a double batch that  will have to be frozen!
For about 2 sheets of regular size cookies:
In 1 bowl whisk :
1/2 of a butter (so 125 g)
1 cup of sugar (the original calls for a mix of brown and white for a number of reasons, I have just brown, so...:-)
and when the sugar dissolves add 1 egg (didn´t wait and got them a bit crunchier than I would like)

In a slightly bigger bowl mix:
2 1/4 cups of flour (now, here we have 3 types of flour - I like to use a mix of fine and semicoarse)
1 1/2 teaspoon of cornstarch
1/2 teaspoon of salt
1/2 teaspoon of baking soda
vanill extract (I never have it so pointless for me:-)
And whatever bits and pieces you like in them (I have a mix of seeds and local hazelnuts in mine)

Pour liquidy stuff into the flour mix and give it some effort to make it look like cookie dough (just mix it well:-). They say it is important to cool the dough for at least 2 hours, which I did not and it worked just fine. Roll into balls and perhaps press slightly (if you like thinner cookies like me). Bake for 10-11 minutes on about 180°- 190°C. Let cool on the tray for a bit, then transfer onto a cooling rack. Then consume while still hot and you might get a tummy ache like me:-) I am just kidding, I ate a heavy breakfast and thus cookies were just the last drop.
I like to use an Ikea kids plastic beaker for measuring cups, since I don´t even have proper tools for that. But, with limited resources, I feel my imagination flourishes:-)

I´ll try to add the Czech version soon!!

27. 4. 2013

Cherry tree blossoming

Tak je to tu, včera se rozpučely první květy na naší třešni a dnes puká a pučí celý kraj! Alespoň je konečně i počasí na to být venku a všichni, i já nemocná, si to užíváme. Snad take přijde ten čas, kterému se říká "volný" nebo také "čas pro sebe" a já zase budu moci něco vyrobit. Seznam mám už hodně dlouhý:-) Posledních pár dní trávím se svým novým ultra chytrým telefonem a učím se od něj. Treba jak zřídit vodoznak na fotografii. Něco už jsem pochytila, zde jsou výsledky:

So it has begun. The cherry tree in our garden showed us its first few blossoms yesterday and today the whole village is blooming. It is finally quite peasant to be outside, so we have been taking an advantage of that now, and I am hoping for some more of the ever so rare "free" time and also a little bit of the "me" time would be nice. i need to get creative again, so far I have been befriending my new and very smart phone and it has taught me some neat things, e.g. how to watermark images, so here we go:-)

14. 3. 2013

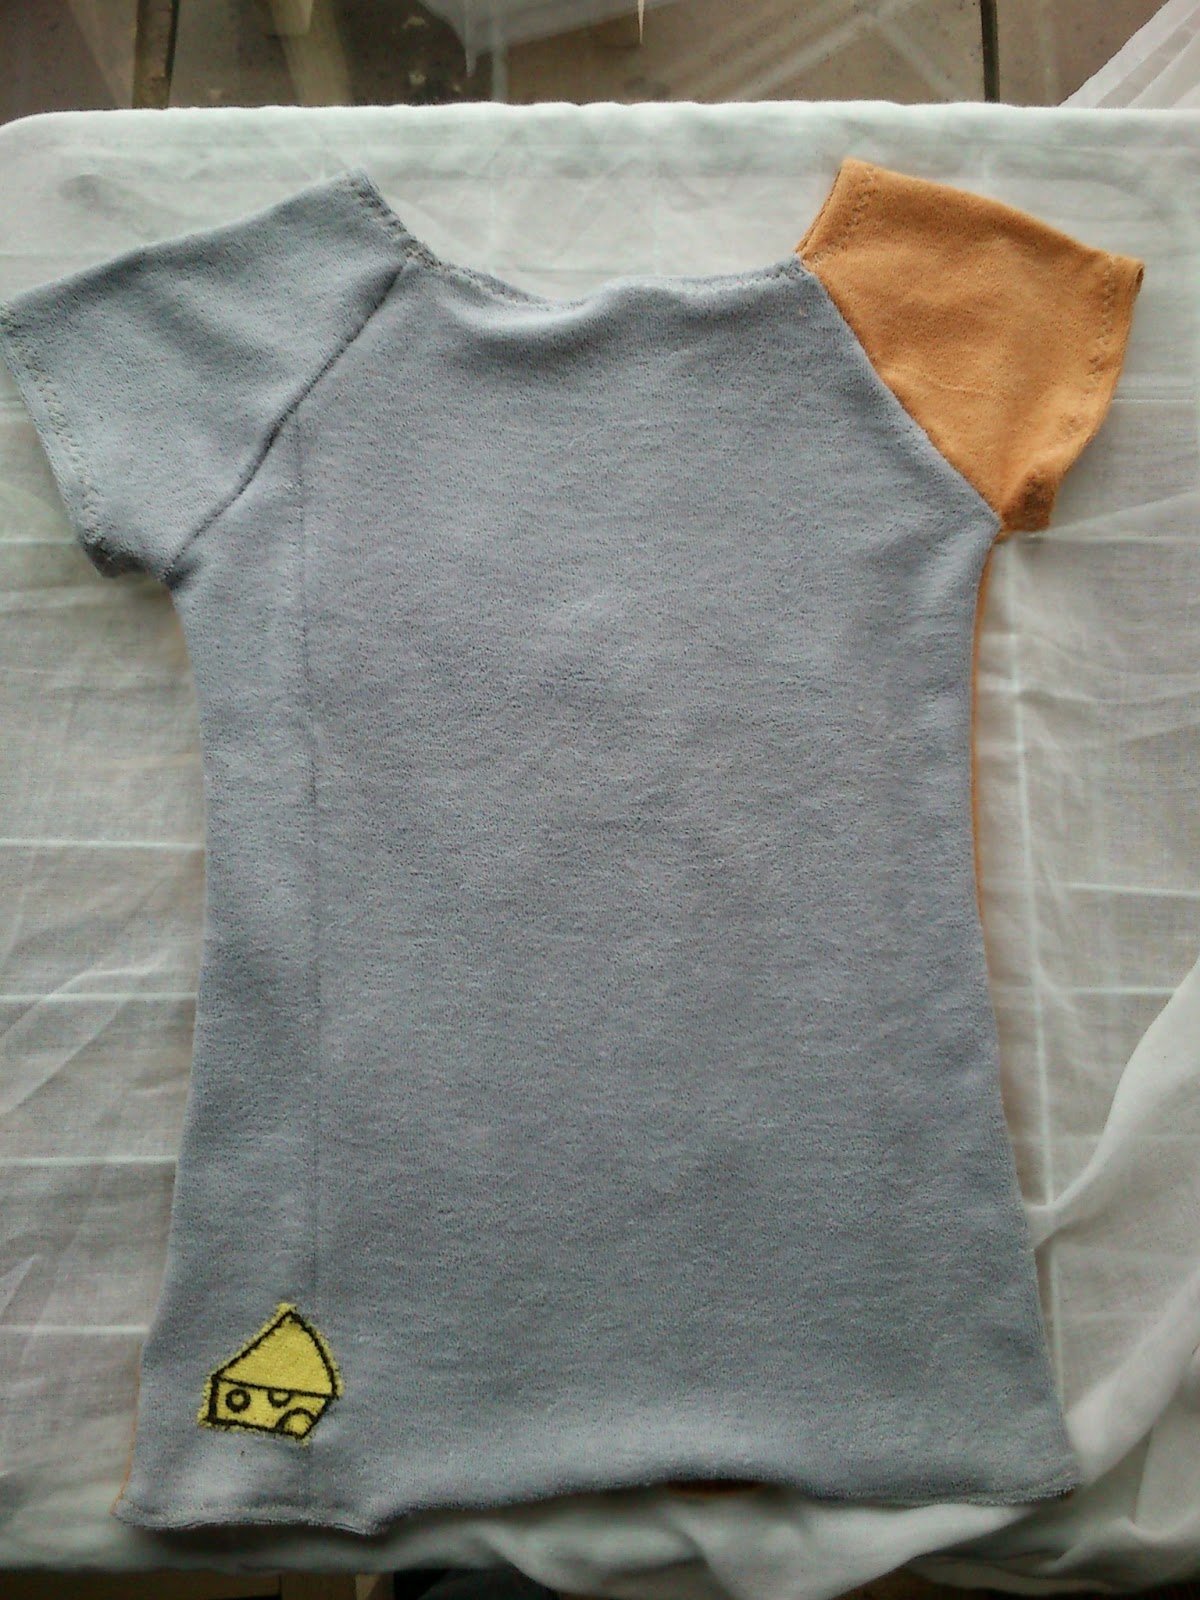
Myšotriko /The Mouse Tee

Sláva vynálezu jménem prostřihy!!
Za pár korun kilo froté nebo i jiných materiálů, většinou čtverce či obdélníky, na dětské velikosti ideál, a když to není ideál, tak se to nějak udělá, aby byl:-)

Jen ty barvy byly mojí várce trochu mdlé, žlutou jsem použila na kostým pro Lili (uvidíte později) a zelenou šetřím. Ta fialová je krásná, ale jinak samá myší šeď a tělová. No, tak co jiného s tím, že.
Ta aplikace šla překvapivě jednoduše našít, vybrala jsem takový zajímavý steh, co na mém (starém) stroji málo kdy použiju, vypadá jak cikcak, ale nad každým vrcholem je ještě taková mašlička. Říkám mu tedy mašličkový.

Velikost je asi 104, detaily jsou dokreslené obyč fixou na textil. Jo a jinak je to teda ušitý dost hrozně, nejspíš jsem se překonala v tom, jak nerada špendlím a používám střihy, takže jeden rukáv je delší, no a celkově je to takové "kreativní":-) (to je teď moje oblíbené slovo, poslední Zen žen v Respektu mě hodně pobavil:-)


Where´s my cheese?


S tím velkým výstřihem budu muset ještě něco udělat / This  will have to be fixed somehow, it is too loose


Mašličkový steh:-) A Bow stitch:-)


 The tee is made of leftovers of terry that bedsheet makers here sell by kilos and they are really cheap. Usually they come in square or rectangle shapes and their size is perfect for children´s wear.

The mouse was actually pretty easy to sew on, I used something that looked like a bow shaped stitch on my (very old) machine, probably a fake overlock stitch:-)
As I am not a great seemstress and hate things like pinning and measuring, the result is very, errr, "creative" - one sleeve longer, and the neckline! Well, that´s the price for sewing quickly:-)


27. 2. 2013

Neboněco / The orsomething


No konečně. Mám pět minut volna než děcka něco začnout chtít a Blogger nevalí! Tak teda konečně!

Pořád jen něco krásného a inspirativního čtu a sama bych ráda psala, jenže jsou tu pořád nějaké nočníky, co potřebují vynést, poblitíčka čekající na utření, nádobí, prádlo, vaření NEBONĚCO. Furt samý "neboněco".

Ale je tu něco (a není to neboněco) malého, co bych ráda sdílela - po dlouhé době zase používám kvásek a je to úžasné, co se s ním dá dělat, zvlášť když člověk nemá čas a nechce kupu nádobí. A je to zdravé (tedy doufám:-)

První byl chléb, ke kterému jsem se inspirovala u Hanky zde. Trochu jsem si ho upravila (já prostě nedokážu dodržet recept), ale stejně vyšel dobře:-) Říkám mu Chléb z hrnce.

Bylo s ním ale moc nádobí, takže upraven byl ještě jednou a to za pomoci receptu, který byl u naší pekárny a teď se dopekl. Ještě tedy nevím, jak dobře to dopadlo, napíšu snad později. Je to Líný chléb. Jen jeden hrnec na mytí a forma do pekárny.

Kvásku je najednou hromada, nějak se rozmnožil, takže jsem vyzkoušela všechno možné, na co byl čas. Třeba sušenky. Vyšly z toho koláčky a nic moc jim ten kvásek nepomohl. Takže tudy ne , přátelé:-) Musí to mít čas bublat a tohle jsem jen zamíchala a šlo to do trouby. Ani nemám fotku, jsou to takové ovesné hrudky s medem a datlemi, dobré, ale prostě ne to, co jsem zamýšlela. To je holt ta druhá stránka nedodržování receptů.

Ale co se povedlo, bylo toto:


Finally! I have about five minutes of spare time before the kids start to need me again and Blogger does not want to get to work!! So finally!!

I have been wanting to publish something little for a long time, I sometimes read the wonderful ideas and look at the wonderful pictures that other people post and really really wish I could share some of my own, but there is always some potty to be washed, spit up to be cleaned, dishes, laundry, cooking OR SOMETHING. My life seems to be full of these orsomethings now..

Yet, there is a little something (not an orsomething:-) I want to share - I have started to use sourdough again recently and have a couple of recipes that are fun and healthy (I hope). Plus - some are even low on mess and work altogether:-)

Arghh! I have started to write this article a month ago!! A MONTH!! Bloody orsomethings... well, no more energy left today, please let me know, if you´d like me to add more English details here!!

Houbiča na mytí / Washing-up sponge


Krásná, funkční, nesmrdí a je nanejvýš eko - z oveček a recyklovatelná. Háčkovala jsem ze Šumavské ovčí vlny, myslím, že to byla ta šedá, nebo světle hnědá, jsou si dost podobné. Druhé klubko byla ta samá vlna, jen barvou původně přírodní, kterou jsem doma barvila afrikány na ..., no na tu barvu, co má na fotce:-)

Takže háčkováno ve dvoje, zároveň jsem mohla otestovat nové háčky z bambusu, tento byl velikost 6,5 a šlo to hladce. Návod najdete u Calennduly, je nesmírně šikovná!!


A beautiful, functional, non-smelling and super duper eco-friendly - made from 100% wool and easy to recycle. Crochetted  from this wool that I sell at my shop , the colour was either grey or light brown, I cannot recall as they are quite similar, the other was originally natural and I dyed it with some flowers to a slightly brownish shade.
Crochetted with double yarn using my wondeful new hook which is made of bamboo, size 6,5.
I found the idea right here, she is sooo inspirational!!